# Ship It to the Cloud A Complete Beginner's Guide to Google Cloud Run
> Cloud/DevOps Engineer *This guide assumes you know almost nothing. By the end, you'll know everything you need to deploy a real app to the cloud like a pro.*
***
### Before We Write a Single Command let's Understand What We're Working With
Every tutorial throws tools at you without explaining what they actually *are*. Not this one. Let's fix that first.
***
### What is Docker?
Imagine you built an app on your laptop. It works perfectly. You send it to your friend it breaks. He has a different OS, different versions of software, different everything. Classic developer nightmare.
**Docker solves this.** It lets you package your app along with *everything it needs to run* the OS layer, the runtime, the dependencies, the config into one tidy box called a **container**. You ship that box. It runs the same way everywhere. On your laptop, your friend's machine, or a server in Germany.
Think of a Docker container like a **shipping container on a cargo ship**. The ship doesn't care what's inside clothes, electronics, food. It just moves containers. And the container keeps everything inside safe and consistent no matter where it travels.
A **Dockerfile** is the recipe that tells Docker *how to build* that container. Here's ours:
> You could find my index.html in [my Repo](https://github.com/omartamer630/DevOps-Kitchen/blob/main/GCP/cloudrun_master_container_deployment/index.html) or you can Generate yours
```dockerfile
# Start with a pre-built nginx web server image (Alpine = super lightweight Linux)
FROM nginx:alpine
# Copy our HTML file into the place nginx serves files from
COPY index.html /usr/share/nginx/html/index.html
# Document that this container will listen on port 80
EXPOSE 80
# When the container starts, run nginx in the foreground
CMD ["nginx", "-g", "daemon off;"]
```
> 💡 **Why `daemon off;`?** Containers stay alive as long as their main process is running. If nginx runs in the background (as a "daemon"), Docker sees no foreground process and kills the container immediately. `daemon off;` keeps nginx in the foreground so the container stays alive.
**Can I use something other than Docker?** Yes, **Podman** is a popular Docker alternative that works without needing root access and is more secure by default. But Docker is the industry standard, and Cloud Run supports any container built to the OCI standard (which both Docker and Podman follow). For this guide, we use Docker.
***
### What is Cloud Run?
You've got your app packaged in a Docker container. Now where do you *run* it?
You could rent a virtual machine (like a GCP Compute Engine VM or an AWS EC2 instance), install Docker on it, run the container manually, manage the server, handle updates, worry about crashes... That's a lot of work.
**Cloud Run is the alternative.** It's a fully managed application platform that lets you run containers that are invocable via requests or events. Cloud Run is serverless: it abstracts away all infrastructure management, so you can focus on what matters most building great applications.
So Simply you just hand Google your container and say *"run this."* Google handles:
* The servers underneath
* Scaling up when traffic increases
* Scaling back down (even to zero!) when no one is using it
* HTTPS automatically no SSL certificate headaches
* You only pay for the exact seconds your container is actually handling requests
> **The Restaurant Analogy**
>
> Running your own VM is like owning a restaurant, you manage the building, the staff, the equipment, even when no customers show up. Cloud Run is like renting a kitchen only when you need to cook. No customers? You pay nothing. Rush hour hits? More kitchen space appears automatically.
**Can I use something other than Cloud Run?**
Absolutely. Here are the main alternatives:
| Platform | Provider | Notes |
| ------------------------ | ----------------- | ---------------------------------------------------------- |
| **Cloud Run** | Google (GCP) | What we're using, scales to zero, pay per use |
| **AWS App Runner** | Amazon (AWS) | Very similar concept, great if you're in the AWS ecosystem |
| **Azure Container Apps** | Microsoft (Azure) | Microsoft's equivalent |
| **Fly.io** | Independent | Great for small projects, very developer-friendly |
| **Railway** | Independent | Extremely beginner-friendly, great DX |
| **Heroku** | Salesforce | The OG platform-as-a-service, a bit pricier now |
All of these let you deploy containers without managing servers. Cloud Run is excellent because it scales to zero (no idle cost), integrates perfectly with GCP services, and is enterprise-grade reliable.
***
### What is Artifact Registry?
Before Cloud Run can run your container, it needs to be able to *find* it somewhere on the internet. You can't just say "use the image on my laptop" your laptop isn't accessible to Google's servers.
**Artifact Registry is GCP's private container storage.** Think of it as a private Docker Hub that lives inside your GCP project. You push your Docker image there, and then Cloud Run (or any GCP service) can pull it from there to run it.
> **The Library Analogy**
>
> Your Docker image is a book you wrote. Artifact Registry is the library where you store it. Cloud Run is the reader who checks it out and runs with it. Without the library in the middle, the reader has no way to find your book.
**Can I use something other than Artifact Registry?**
Yes! Here are the alternatives:
| Registry | Notes |
| ----------------------------- | ---------------------------------------------------------------- |
| **Artifact Registry** (GCP) | What we're using,native GCP, tight integration |
| **Container Registry** (GCP) | Older GCP option, being phased out in favor of Artifact Registry |
| **Docker Hub** | The most popular public registry. Free for public images |
| **Amazon ECR** | AWS's equivalent, works great if you're in the AWS ecosystem |
| **GitHub Container Registry** | Great if your code is already on GitHub |
| **GitLab Registry** | Built into GitLab CI/CD pipelines |
For Cloud Run on GCP, Artifact Registry is the natural choice, same ecosystem, same permissions system, faster pulls.
***
### The Full Picture Before We Start
Now that you know what each tool is, here's how they work together:
```
You write code
│
▼
Docker packages it into an image (the "container blueprint")
│
▼
You push the image to Artifact Registry (cloud storage for images)
│
▼
Cloud Run pulls the image and runs it as a live service
│
▼
Users visit your HTTPS URL → they hit your running container
```
Simple. Now let's actually do it.
***
### Setting Up: Point gcloud at Your Project
> If you don't have gcloud you can know the steps from [here](https://docs.cloud.google.com/sdk/docs/install-sdk)
`gcloud` is Google's command-line tool for managing everything in GCP. Before running any commands, you need to tell it which GCP project you're working in (because your account might have dozens of projects):
```bash
gcloud config set project PROJECT_ID
```
Replace `PROJECT_ID` with your actual project ID — you can find it in the GCP Console dashboard.
***
### Create Your Artifact Registry Repository
Before pushing any image, you need a place to push it *to*. Let's create a Docker repository inside Artifact Registry:
```bash
gcloud artifacts repositories create REPOSITORY \
--repository-format=docker \
--location=REGION
```
* `REPOSITORY` — give it a name, like `my-app-repo`
* `--repository-format=docker` — we're storing Docker images (Artifact Registry also supports Maven, npm, Python packages, etc.)
* `--location` — where in the world your repository lives, e.g. `europe-west3` for Frankfurt
Then tell Docker how to authenticate with this registry:
```bash
gcloud auth configure-docker REGION-docker.pkg.dev
```
This command writes credentials into Docker's config so it knows how to log into GCP's registry automatically. Without this, Docker would get a "permission denied" when trying to push.
**Commands's Output:**
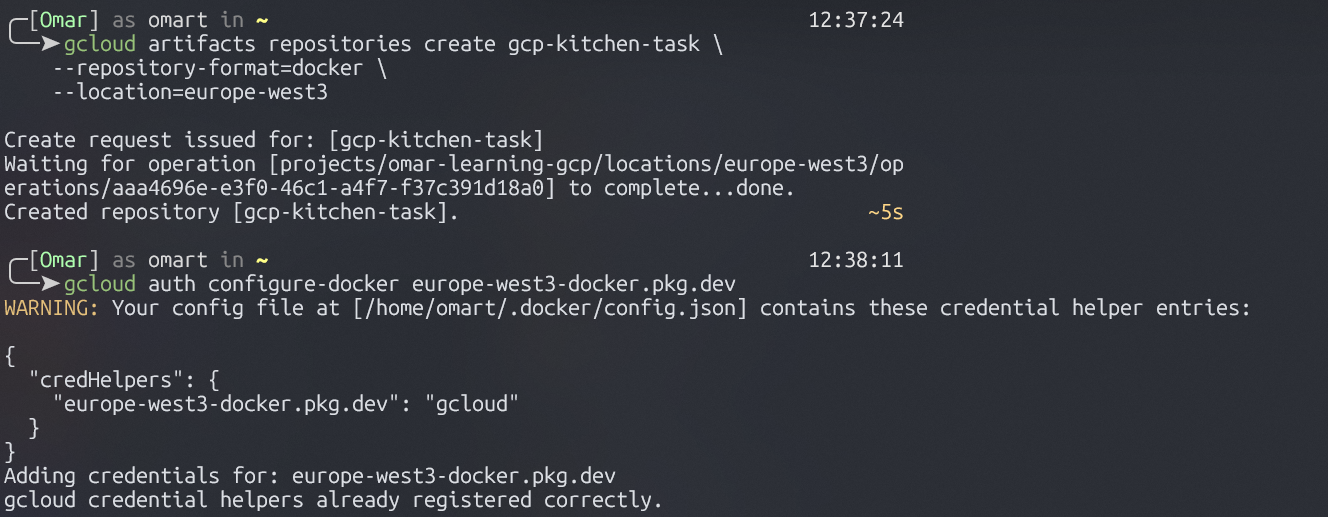 **Verify That the New Repository** `gcp-kitchen-task` has been created**:**
 ***
### Tag and Push Your Docker Image
Your image is built locally. Now we need to give it an address that points to your Artifact Registry, then upload it:
```bash
# Tag the image with its destination address
docker tag SOURCE-IMAGE REGION-docker.pkg.dev/PROJECT_ID/REPOSITORY/IMAGE:TAG
# Push it up
docker push REGION-docker.pkg.dev/PROJECT_ID/REPOSITORY/IMAGE:TAG
```
> **What does "tagging" mean?**
>
> A Docker tag is just a name/address for your image. When you tag it with the registry path, you're essentially saying "this image belongs at this address." Then push sends it there. Think of it like putting a shipping label on a package before dropping it off.
The address format breaks down like this:
```
REGION-docker.pkg.dev / PROJECT_ID / REPOSITORY / IMAGE : TAG
│ │ │ │ │
Region Project Repo Name Version
```
**Commands's Output:**
***
### Tag and Push Your Docker Image
Your image is built locally. Now we need to give it an address that points to your Artifact Registry, then upload it:
```bash
# Tag the image with its destination address
docker tag SOURCE-IMAGE REGION-docker.pkg.dev/PROJECT_ID/REPOSITORY/IMAGE:TAG
# Push it up
docker push REGION-docker.pkg.dev/PROJECT_ID/REPOSITORY/IMAGE:TAG
```
> **What does "tagging" mean?**
>
> A Docker tag is just a name/address for your image. When you tag it with the registry path, you're essentially saying "this image belongs at this address." Then push sends it there. Think of it like putting a shipping label on a package before dropping it off.
The address format breaks down like this:
```
REGION-docker.pkg.dev / PROJECT_ID / REPOSITORY / IMAGE : TAG
│ │ │ │ │
Region Project Repo Name Version
```
**Commands's Output:**
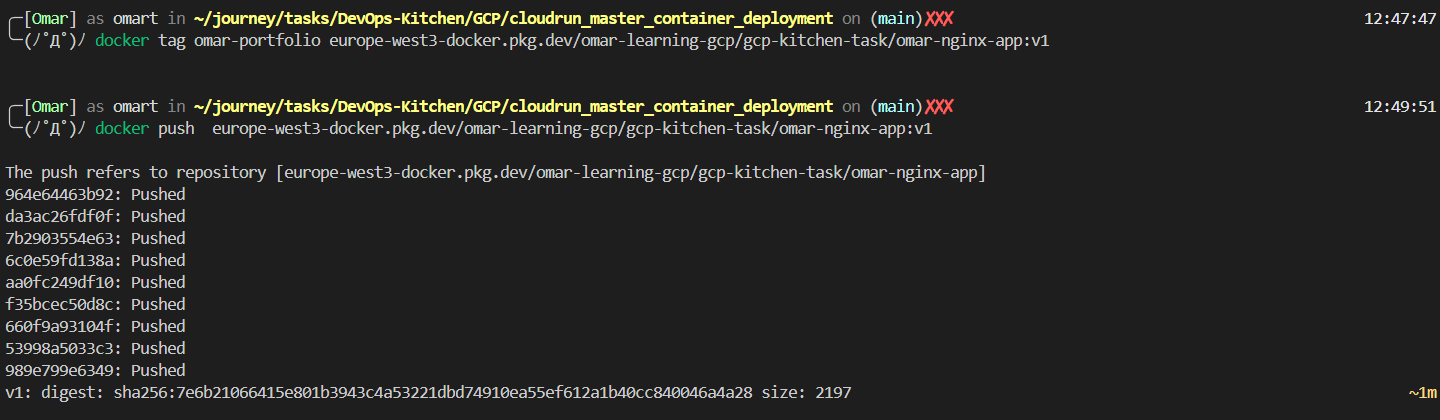 **Verify that image has been pushed:**
 ***
### Deploy v1: Your App Goes Live
This is the moment everything comes together. One command, and your container becomes a real, live, HTTPS service on the internet:
```bash
gcloud run deploy SERVICE_NAME \
--image REGION-docker.pkg.dev/PROJECT_ID/REPOSITORY/IMAGE:TAG \
--allow-unauthenticated \
--revision-suffix REVISION_SUFFIX_V1 \
--port PORT \
--region REGION
```
Let's break down every flag:
| Flag | What it does |
| ------------------------- | ----------------------------------------------------------------- |
| `SERVICE_NAME` | The name of your Cloud Run service |
| `--image` | Which container image to run (pulled from your Artifact Registry) |
| `--allow-unauthenticated` | Makes the service publicly accessible, no login needed |
| `--revision-suffix appv1` | Names this deployment snapshot "appv1" |
| `--port` | Tells Cloud Run which port your container listens on |
| `--region REGION` | Where to deploy, pick a region close to your users |
> **What is a Revision?**
>
> Every time you deploy to Cloud Run, it creates a **revision** — a frozen, immutable snapshot of your container + its configuration. Think of it exactly like a Git commit, but instead of saving code, it saves your *running service state*. You can have 20 revisions and roll back to any of them instantly. This is the foundation for everything we do next.
After this command runs, Google gives you a URL like: `https://SERVICE_NAME-abc123-ew.a.run.app`
That's your live app. Real HTTPS. Zero config.
**Commands's output:**
***
### Deploy v1: Your App Goes Live
This is the moment everything comes together. One command, and your container becomes a real, live, HTTPS service on the internet:
```bash
gcloud run deploy SERVICE_NAME \
--image REGION-docker.pkg.dev/PROJECT_ID/REPOSITORY/IMAGE:TAG \
--allow-unauthenticated \
--revision-suffix REVISION_SUFFIX_V1 \
--port PORT \
--region REGION
```
Let's break down every flag:
| Flag | What it does |
| ------------------------- | ----------------------------------------------------------------- |
| `SERVICE_NAME` | The name of your Cloud Run service |
| `--image` | Which container image to run (pulled from your Artifact Registry) |
| `--allow-unauthenticated` | Makes the service publicly accessible, no login needed |
| `--revision-suffix appv1` | Names this deployment snapshot "appv1" |
| `--port` | Tells Cloud Run which port your container listens on |
| `--region REGION` | Where to deploy, pick a region close to your users |
> **What is a Revision?**
>
> Every time you deploy to Cloud Run, it creates a **revision** — a frozen, immutable snapshot of your container + its configuration. Think of it exactly like a Git commit, but instead of saving code, it saves your *running service state*. You can have 20 revisions and roll back to any of them instantly. This is the foundation for everything we do next.
After this command runs, Google gives you a URL like: `https://SERVICE_NAME-abc123-ew.a.run.app`
That's your live app. Real HTTPS. Zero config.
**Commands's output:**
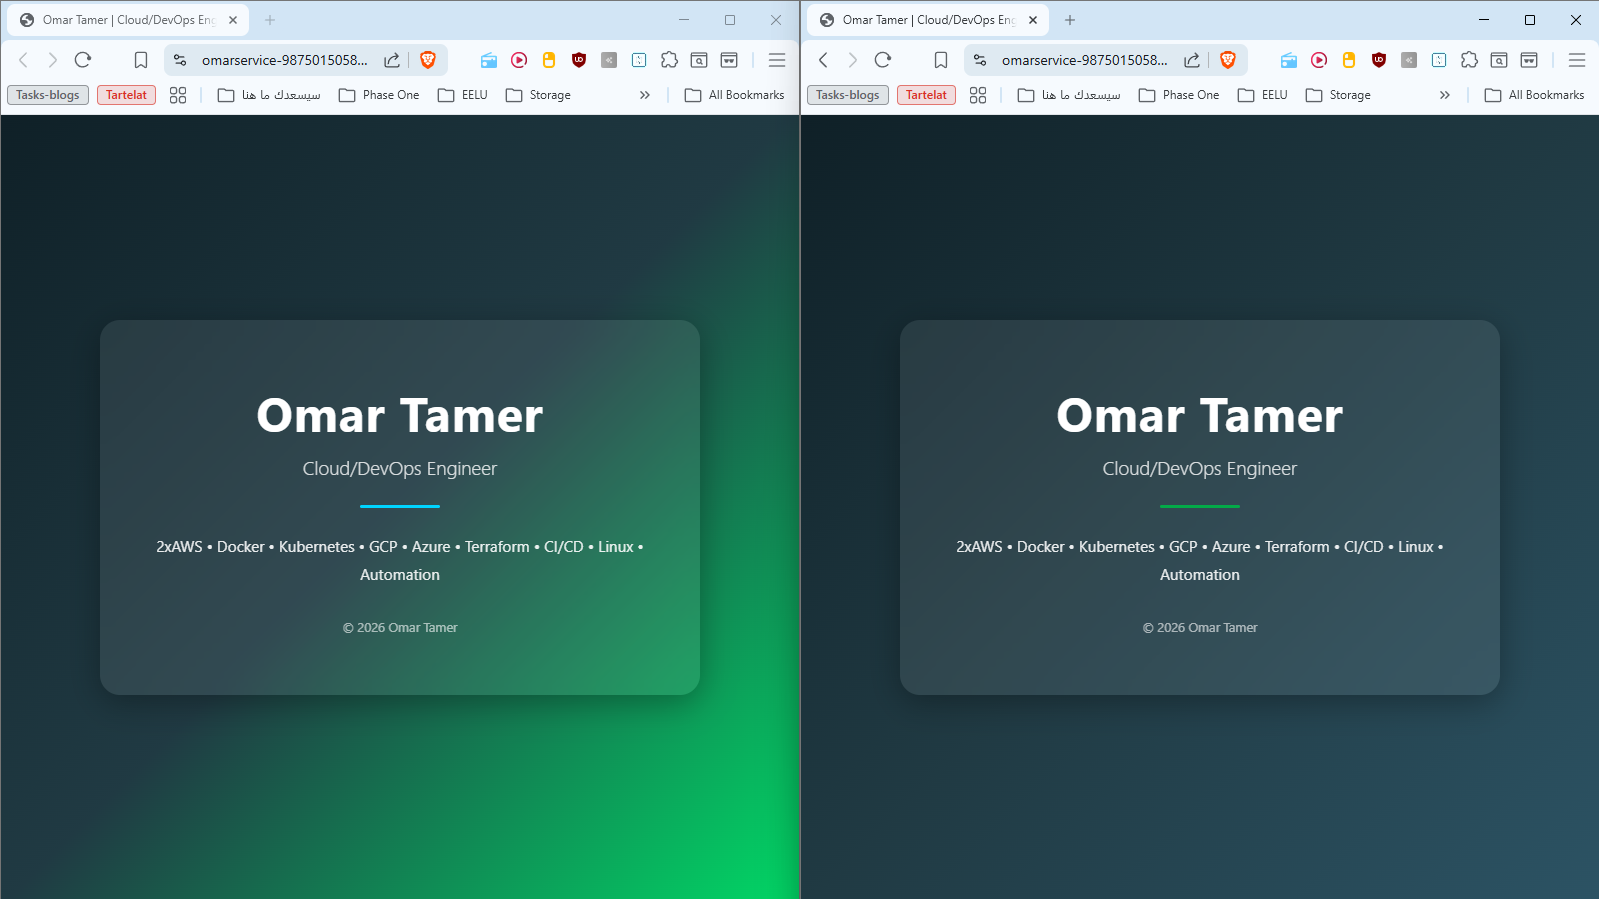
 Accessing the Link is a Verification that the app is running
After Opening the link:
Accessing the Link is a Verification that the app is running
After Opening the link:
 ***
### Deploying v2 Without Breaking Anything: Traffic Splitting
Here's the real-world scenario: v1 is live, real users are on it, and you want to ship v2. But what if v2 has a bug? You don't want to break everyone at once.
This is what **traffic splitting** is for. You control *what percentage of users* goes to each revision. Deploy v2 first with zero traffic, test it quietly, then gradually shift users over.
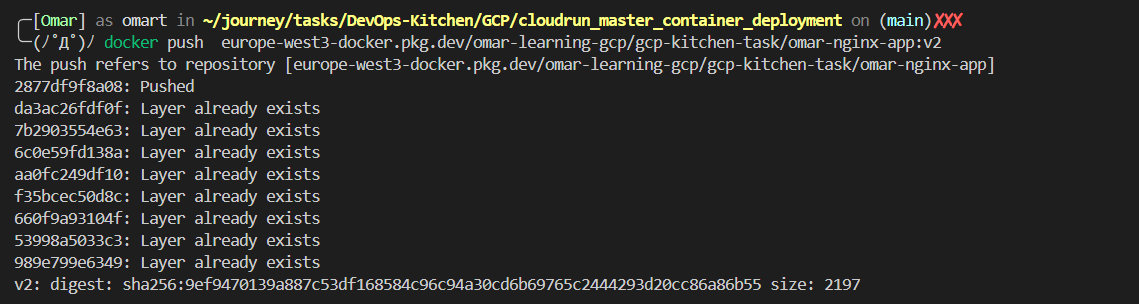
#### Step 0: ReBuild Dockerfile, Tag and Push the image
```bash
docker build -t IMAGE_NAME .
```
Using the command to build our Dockerfile, the dot means we're building Dockerfile in the same path that we are standing on.
```bash
docker tag IMAGE_NAME REGION-docker.pkg.dev/PROJECT_ID/REPOSITORY/IMAGE:v2
docker push REGION-docker.pkg.dev/PROJECT_ID/REPOSITORY/IMAGE:v2
```
then we tagged the image and pushed it to our Repository
**Command's Output:**
***
### Deploying v2 Without Breaking Anything: Traffic Splitting
Here's the real-world scenario: v1 is live, real users are on it, and you want to ship v2. But what if v2 has a bug? You don't want to break everyone at once.
This is what **traffic splitting** is for. You control *what percentage of users* goes to each revision. Deploy v2 first with zero traffic, test it quietly, then gradually shift users over.
#### Step 0: ReBuild Dockerfile, Tag and Push the image
```bash
docker build -t IMAGE_NAME .
```
Using the command to build our Dockerfile, the dot means we're building Dockerfile in the same path that we are standing on.
```bash
docker tag IMAGE_NAME REGION-docker.pkg.dev/PROJECT_ID/REPOSITORY/IMAGE:v2
docker push REGION-docker.pkg.dev/PROJECT_ID/REPOSITORY/IMAGE:v2
```
then we tagged the image and pushed it to our Repository
**Command's Output:**
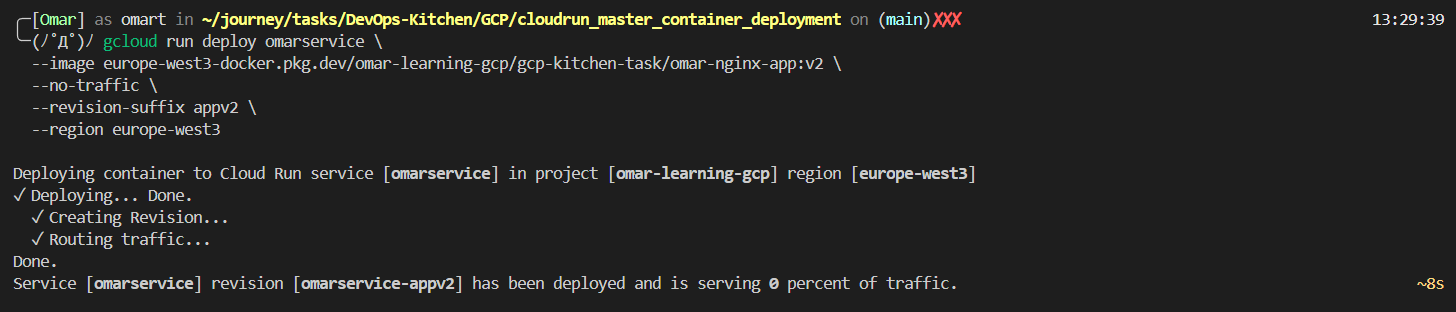
 #### Step 1: Deploy v2 With Zero Traffic
```bash
gcloud run deploy SERVICE_NAME \
--image REGION-docker.pkg.dev/PROJECT_ID/REPOSITORY/IMAGE:TAG \
--no-traffic \
--revision-suffix REVISION_SUFFIX_V2 \
--region REGION
```
`--no-traffic` is the magic flag. v2 is deployed and running — but zero users are sent to it yet. You can test it via its revision URL while v1 keeps serving everyone else without interruption.
**Command's Output:**
#### Step 1: Deploy v2 With Zero Traffic
```bash
gcloud run deploy SERVICE_NAME \
--image REGION-docker.pkg.dev/PROJECT_ID/REPOSITORY/IMAGE:TAG \
--no-traffic \
--revision-suffix REVISION_SUFFIX_V2 \
--region REGION
```
`--no-traffic` is the magic flag. v2 is deployed and running — but zero users are sent to it yet. You can test it via its revision URL while v1 keeps serving everyone else without interruption.
**Command's Output:**
 #### Step 2: Canary Release: Send 30% of Users to v2
```bash
gcloud run services update-traffic SERVICE_NAME \
--to-revisions SERVICE_NAME-REVISION_SUFFIX_V1=70,SERVICE_NAME-REVISION_SUFFIX_V2=30 \
--region REGION
```
Now 30% of real users hit v2. Watch your logs and metrics. Errors spiking? Roll back instantly. Everything clean? Go full.
```
appv1 (stable) ████████████████████████████░░░░░░░░░░░░ 70%
appv2 (new) ████████████░░░░░░░░░░░░░░░░░░░░░░░░░░░░ 30%
```
**Command's Output:**
#### Step 2: Canary Release: Send 30% of Users to v2
```bash
gcloud run services update-traffic SERVICE_NAME \
--to-revisions SERVICE_NAME-REVISION_SUFFIX_V1=70,SERVICE_NAME-REVISION_SUFFIX_V2=30 \
--region REGION
```
Now 30% of real users hit v2. Watch your logs and metrics. Errors spiking? Roll back instantly. Everything clean? Go full.
```
appv1 (stable) ████████████████████████████░░░░░░░░░░░░ 70%
appv2 (new) ████████████░░░░░░░░░░░░░░░░░░░░░░░░░░░░ 30%
```
**Command's Output:**
 After multiple refresh we will see the new update as below:
 **Command's Output:**
 #### Step 3: Full Cutover to v2
```bash
gcloud run services update-traffic SERVICE_NAME \
--to-revisions SERVICE_NAME-REVISION_SUFFIX_V2=100 \
--region REGION
```
```
appv1 (retired) ░░░░░░░░░░░░░░░░░░░░░░░░░░░░░░░░░░░░░░░░ 0%
appv2 (live!) ████████████████████████████████████████ 100%
```
> **This technique is called a Canary Release.** Netflix does it. Google does it. Now you do it too. The name comes from the old mining practice of sending a canary into a mine shaft first — if the bird survives, it's safe for everyone else.
***
### Auto-Scaling: Cloud Run Handles the Rush
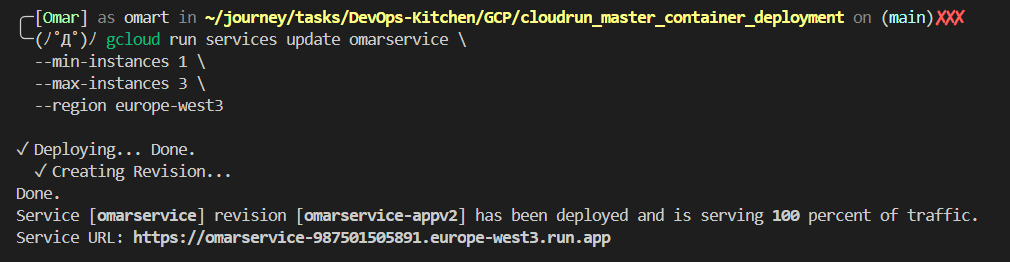
What happens when your app goes viral at 3 AM? With Cloud Run, nothing breaks — it spins up more instances automatically, then scales back down when things quiet.
```bash
gcloud run services update SERVICE_NAME \
--min-instances MIN_INSTANCES \
--max-instances MAX_INSTANCES \
--region REGION
```
| Setting | What it means |
| ------------------- | --------------------------------------------------------- |
| `--min-instances 1` | Always keep at least 1 container running (no cold starts) |
| `--max-instances 3` | Never spin up more than 3 containers (cost control) |
```
Low traffic: [🖥️ running] [💤 idle] [💤 idle] → 1 instance
Traffic spike: [🖥️ running] [🖥️ running] [🖥️ running] → 3 instances
Spike over: [🖥️ running] [💤 idle] [💤 idle] → back to 1
```
> ⚠️ **Cold Start vs Cost**
>
> `--min-instances 0` (default) = scales to zero when idle = **free when unused**, but the first request after a long idle period takes a second or two while a container boots up. `--min-instances 1` = always one warm container ready = small ongoing cost, but instant responses always. Choose based on your latency vs. cost priorities.
**Command's Output:**
#### Step 3: Full Cutover to v2
```bash
gcloud run services update-traffic SERVICE_NAME \
--to-revisions SERVICE_NAME-REVISION_SUFFIX_V2=100 \
--region REGION
```
```
appv1 (retired) ░░░░░░░░░░░░░░░░░░░░░░░░░░░░░░░░░░░░░░░░ 0%
appv2 (live!) ████████████████████████████████████████ 100%
```
> **This technique is called a Canary Release.** Netflix does it. Google does it. Now you do it too. The name comes from the old mining practice of sending a canary into a mine shaft first — if the bird survives, it's safe for everyone else.
***
### Auto-Scaling: Cloud Run Handles the Rush
What happens when your app goes viral at 3 AM? With Cloud Run, nothing breaks — it spins up more instances automatically, then scales back down when things quiet.
```bash
gcloud run services update SERVICE_NAME \
--min-instances MIN_INSTANCES \
--max-instances MAX_INSTANCES \
--region REGION
```
| Setting | What it means |
| ------------------- | --------------------------------------------------------- |
| `--min-instances 1` | Always keep at least 1 container running (no cold starts) |
| `--max-instances 3` | Never spin up more than 3 containers (cost control) |
```
Low traffic: [🖥️ running] [💤 idle] [💤 idle] → 1 instance
Traffic spike: [🖥️ running] [🖥️ running] [🖥️ running] → 3 instances
Spike over: [🖥️ running] [💤 idle] [💤 idle] → back to 1
```
> ⚠️ **Cold Start vs Cost**
>
> `--min-instances 0` (default) = scales to zero when idle = **free when unused**, but the first request after a long idle period takes a second or two while a container boots up. `--min-instances 1` = always one warm container ready = small ongoing cost, but instant responses always. Choose based on your latency vs. cost priorities.
**Command's Output:**
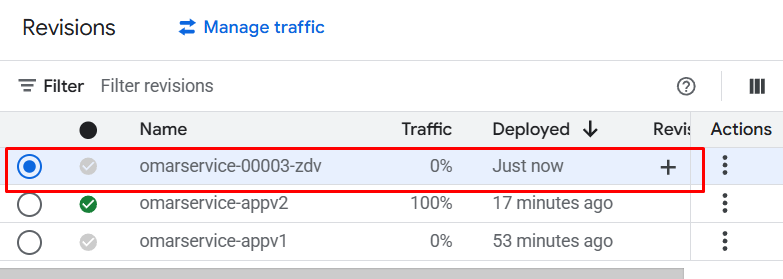
 **Verify Scaling:**
 ***
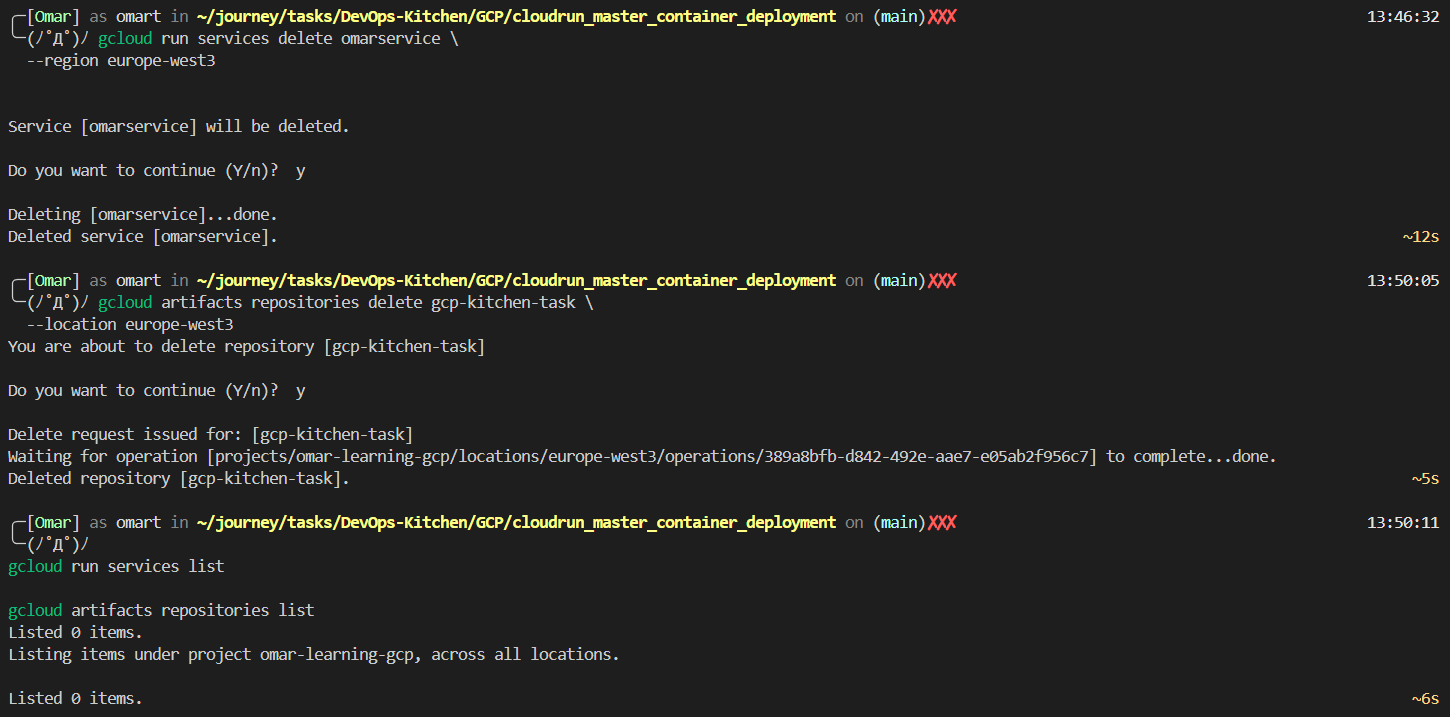
### Cleanup: Leave No Trace
Cloud resources cost money every second they exist. When you're done experimenting, tear everything down cleanly:
```bash
# Delete the Cloud Run service
gcloud run services delete SERVICE_NAME \
--region REGION
# Delete the Artifact Registry repository (and all images inside it)
gcloud artifacts repositories delete REPOSITORY \
--location REGION
# Confirm everything is gone
gcloud run services list
gcloud artifacts repositories list
```
> 🚨 **Always Set Billing Alerts**
>
> Go to GCP Console → Billing → Budgets & Alerts. Set a budget with an alert at 80% and 100% of whatever you're comfortable spending. This is the single most important habit to build as a Cloud engineer. Forgotten resources have cost people thousands of dollars.
**Clean up's output:**
***
### Cleanup: Leave No Trace
Cloud resources cost money every second they exist. When you're done experimenting, tear everything down cleanly:
```bash
# Delete the Cloud Run service
gcloud run services delete SERVICE_NAME \
--region REGION
# Delete the Artifact Registry repository (and all images inside it)
gcloud artifacts repositories delete REPOSITORY \
--location REGION
# Confirm everything is gone
gcloud run services list
gcloud artifacts repositories list
```
> 🚨 **Always Set Billing Alerts**
>
> Go to GCP Console → Billing → Budgets & Alerts. Set a budget with an alert at 80% and 100% of whatever you're comfortable spending. This is the single most important habit to build as a Cloud engineer. Forgotten resources have cost people thousands of dollars.
**Clean up's output:**
 ***
### The Complete Picture
Here's everything from end to end:
```
📁 index.html + Dockerfile ← your app + its recipe
│
▼ docker build
🐳 Docker Image ← your app, packaged and portable
│
▼ docker tag + docker push
📦 Artifact Registry ← your private image storage on GCP
│
▼ gcloud run deploy --revision-suffix appv1
☁️ Cloud Run Service
├── Revision appv1 ←── 70% traffic (stable)
└── Revision appv2 ←── 30% traffic (canary)
│
▼ update-traffic → appv2=100
🌍 Public HTTPS URL → Your Users
│
▼ traffic spike hits
📈 Auto-scales: 1 → 3 instances → back to 1
│
▼ done experimenting
🧹 Delete service + registry ← $0 cost, clean account
```
***
### What You Actually Learned Today
* **Docker:** packages your app + everything it needs into a portable, consistent container
* **Artifact Registry:** GCP's private storage for your Docker images *(alternatives: Docker Hub, Amazon ECR, GitHub Container Registry)*
* **Cloud Run:**runs your container as a fully managed, auto-scaling HTTPS service *(alternatives: AWS App Runner, Azure Container Apps, Fly.io, Railway)*
* **Traffic splitting:** gradually shift users between revisions for safe deployments without downtime
* **Auto-scaling:** Cloud Run handles load spikes automatically; you just set the min/max bounds
* **Cleanup:** always destroy what you don't need; set billing alerts before anything else
**You Can see Full Comands, Code and Dockerfile in** [**Github**](https://github.com/omartamer630/DevOps-Kitchen/tree/main/GCP/cloudrun_master_container_deployment)
***
> **Final Thought**
>
> *Most people think cloud engineering is about memorizing hundreds of commands. It's not. It's about understanding a handful of core ideas containers, registries, managed services, traffic control and knowing how they connect. You now understand the connections. Everything else is just flags.*
***
*Written by* [***Omar Tamer***](https://www.linkedin.com/in/omar-tamer03/) *· Cloud/DevOps Engineer · 2×AWS · GCP · Kubernetes · Terraform · © 2026*
***
### The Complete Picture
Here's everything from end to end:
```
📁 index.html + Dockerfile ← your app + its recipe
│
▼ docker build
🐳 Docker Image ← your app, packaged and portable
│
▼ docker tag + docker push
📦 Artifact Registry ← your private image storage on GCP
│
▼ gcloud run deploy --revision-suffix appv1
☁️ Cloud Run Service
├── Revision appv1 ←── 70% traffic (stable)
└── Revision appv2 ←── 30% traffic (canary)
│
▼ update-traffic → appv2=100
🌍 Public HTTPS URL → Your Users
│
▼ traffic spike hits
📈 Auto-scales: 1 → 3 instances → back to 1
│
▼ done experimenting
🧹 Delete service + registry ← $0 cost, clean account
```
***
### What You Actually Learned Today
* **Docker:** packages your app + everything it needs into a portable, consistent container
* **Artifact Registry:** GCP's private storage for your Docker images *(alternatives: Docker Hub, Amazon ECR, GitHub Container Registry)*
* **Cloud Run:**runs your container as a fully managed, auto-scaling HTTPS service *(alternatives: AWS App Runner, Azure Container Apps, Fly.io, Railway)*
* **Traffic splitting:** gradually shift users between revisions for safe deployments without downtime
* **Auto-scaling:** Cloud Run handles load spikes automatically; you just set the min/max bounds
* **Cleanup:** always destroy what you don't need; set billing alerts before anything else
**You Can see Full Comands, Code and Dockerfile in** [**Github**](https://github.com/omartamer630/DevOps-Kitchen/tree/main/GCP/cloudrun_master_container_deployment)
***
> **Final Thought**
>
> *Most people think cloud engineering is about memorizing hundreds of commands. It's not. It's about understanding a handful of core ideas containers, registries, managed services, traffic control and knowing how they connect. You now understand the connections. Everything else is just flags.*
***
*Written by* [***Omar Tamer***](https://www.linkedin.com/in/omar-tamer03/) *· Cloud/DevOps Engineer · 2×AWS · GCP · Kubernetes · Terraform · © 2026*