# Kubernetes – Core Pod Lifecycle & Storage
## Task
**#week\_one – Mastering Pod Management**
**duration: 1 week**
**ForgTech** company wants to test your ability to deliver their requirements into a local Kubernetes environment. This will help you build a **good reputation** within the engineering team. The purpose of this task is to prove your capabilities in managing the complete lifecycle of a **Pod**, ensuring high availability through advanced health checks and implementing persistent storage solutions.
#### Company Scenario
The **ForgTech** Cloud Team is moving toward a "Container-First" strategy for all internal microservices. However, the initial deployments have suffered from intermittent downtime during startup and lack data persistence when pods are restarted. To maintain our **standard of excellence**, you are required to design a pod specification that is resilient, resource-aware, and capable of handling stateful data.
#### Mission Description
You are tasked with building a robust application environment within a local cluster. You must configure pods that can signal their internal health to the Kubernetes control plane, manage their own resource consumption to avoid cluster-wide starvation, and mount persistent volumes to ensure data survives pod crashes. This is an assignment to build a production-ready pod manifest, not a basic tutorial.
#### Technical Requirements
1. Initialize a local Kubernetes environment using **kind** or **minikube**. **Do not use cloud-managed services** \[Instructions].
2. **Pod Creation:** Define a multi-container pod (Sidecar pattern) utilizing a lightweight image (e.g., `nginx` or `alpine`).
3. **Health Probes:** Implement all three probe types to manage the pod lifecycle:
* **Startup Probe:** To handle slow-starting legacy components.
* **Readiness Probe:** To ensure the pod only receives traffic when the application is fully initialized.
* **Liveness Probe:** To automatically restart the container if the application becomes unresponsive.
4. **Resource Management:** Define explicit **Requests and Limits** for CPU and Memory. The configuration must prevent "noisy neighbor" behavior while allowing for necessary bursts.
5. **Persistent Storage:** Configure a **Volume** and a **VolumeMount**. For this local lab, use a `PersistentVolume` (PV) and `PersistentVolumeClaim` (PVC) backed by local storage to ensure data persistence across pod restarts.
6. **Operational Interaction:** Demonstrate the ability to work with a running pod by executing commands internally (e.g., `kubectl exec`) to verify the mounted volume's integrity.
#### Constraints & Standards
* **Environment Rules:** Use native Kubernetes YAML manifests.
* **Metadata Standards:** Every resource (Pods, PVCs, PVs) MUST include the following labels:
* **Key:** “Environment”, **Value:** “terraformChamps”
* **Key:** “Owner”, **Value:** <“Your\_first\_name“>
* **Code Quality:** Manifests must be clean, modular, and follow standard YAML indentation.
* **Documentation:** Build a **personal document** consisting of what you learned with deep details regarding the differences between the three probe types to assist you in refreshing your knowledge later.
#### Bonus (Optional)
1. **Architecture Diagram:** Build a diagram showing the relationship between the Pod, its Probes, and the Volume lifecycle.
2. **Technical Blog:** Create a post on Hashnode or DEV explaining how **Requests vs. Limits** affect the Kubernetes Scheduler.
3. **ConfigMap Integration:** Inject environment variables into your pod using a `ConfigMap`.
### References
* [Kubernetes Documentation – Pods](https://kubernetes.io/docs/concepts/workloads/pods/)
* [Configure Liveness, Readiness and Startup Probes](https://kubernetes.io/docs/tasks/configure-pod-container/configure-liveness-readiness-startup-probes/)
* [Resource Management for Pods and Containers](https://kubernetes.io/docs/concepts/configuration/manage-resources-containers/)
* [Storage Volumes](https://kubernetes.io/docs/concepts/storage/volumes/)
* [Stressing a Kubernetes Pod](https://medium.com/@bm54cloud/stressing-a-kubernetes-pod-to-induce-an-oomkilled-error-96f3be9c931d)
* [Noisy Neighbors](https://medium.com/@amerather_9719/noisy-neighbors-fa167359d39e)
***
## Solution Explaination
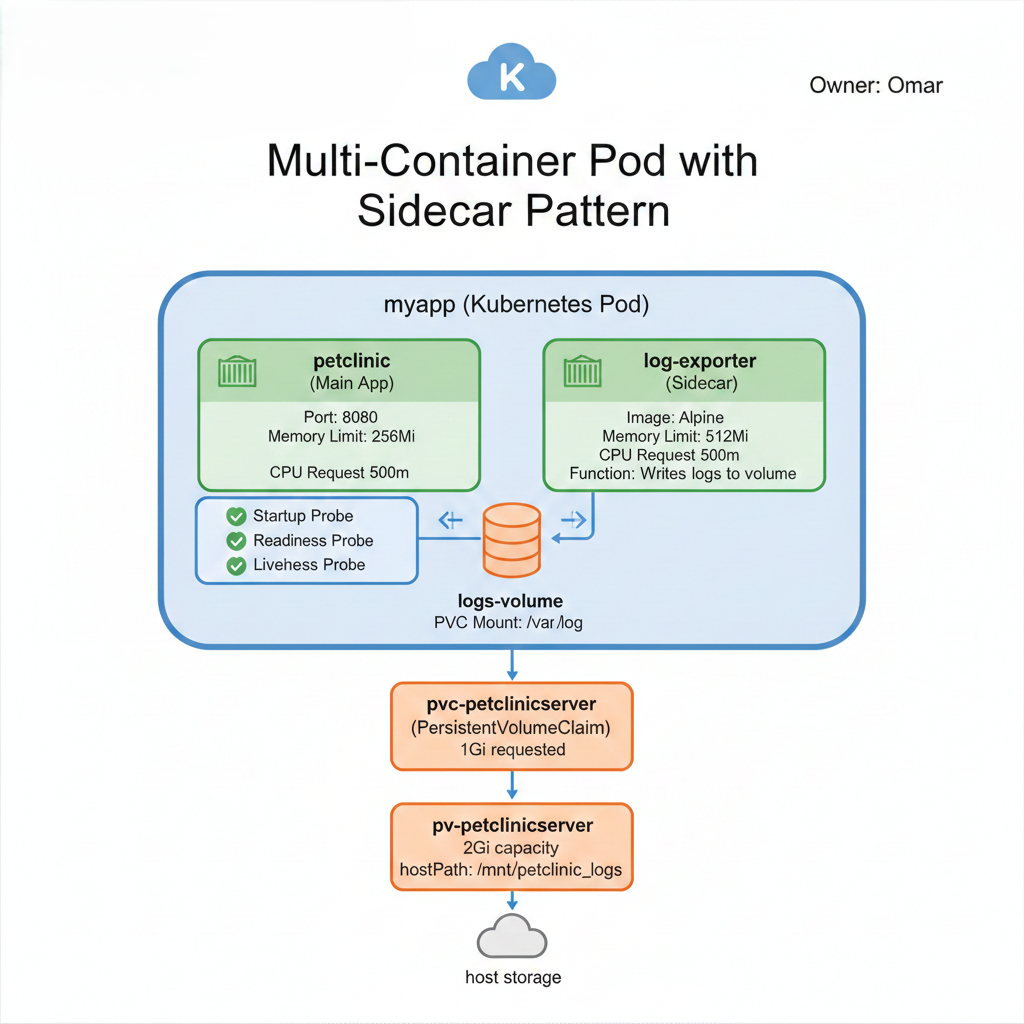
### Architecture Overview
Before diving into the code, let's understand what we're building:
This architecture implements:
* **Multi-container pod** using the Sidecar pattern
* **Three health probes** for comprehensive lifecycle management
* **Persistent storage** ensuring data survives pod restarts
* **Resource constraints** preventing the "noisy neighbor" problem
> **Noisy neighbors occur when a single Pod consumes all node resources affecting others, and the solution is to set resource requests, enforce memory limits, and leave CPU limits unset in trusted clusters.**
***
### Understanding Health Probes
This is where most teams get tripped up. Let's break down each probe type and understand *when* and *why* to use each one.
#### The Three Probe Types: A Complete Breakdown
**1. Startup Probe: The Patient Guardian**
**Purpose**: Protects slow-starting applications from premature termination
**The Problem It Solves**: Imagine you have a legacy Java application that takes 90 seconds to start. Without a startup probe, Kubernetes might think it's dead and kill it before it finishes initializing.
**How It Works**:
* Runs **first** during pod startup
* While running, it **disables** liveness and readiness probes
* Once it succeeds **once**, it never runs again
* If it fails after all attempts, the container restarts
**Key Configuration**:
```yaml
startupProbe:
httpGet:
path: /actuator/health
port: 8080
initialDelaySeconds: 10 # Wait 10s before first check
periodSeconds: 10 # Check every 10s
failureThreshold: 12 # Allow 12 failures (120s total)
timeoutSeconds: 5 # Each probe has 5s to respond
```
> **Startup probes are used for slow-starting applications to give them enough time to initialize, preventing liveness probes from killing the container before the app is actually ready.**
**2. Readiness Probe: The Traffic Controller**
**Purpose**: Controls when the pod receives traffic
**The Problem It Solves**: Your application is running but not ready to handle requests (e.g., warming up caches, establishing database connections). Without a readiness probe, Kubernetes sends traffic immediately, causing errors.
**How It Works**:
* Runs **continuously** throughout the pod's lifetime
* When it **fails**, pod is removed from Service endpoints (no traffic)
* When it **succeeds**, pod is added back to Service endpoints (receives traffic)
* Container is **never restarted** due to readiness failures
**Key Configuration**:
```yaml
readinessProbe:
httpGet:
path: /actuator/health
port: 8080
initialDelaySeconds: 30 # Wait 30s after startup probe succeeds
periodSeconds: 5 # Check every 5s
timeoutSeconds: 3 # Quick response required
failureThreshold: 3 # 3 failures = remove from service
```
> **Readiness probes do not restart containers; they only control traffic flow by removing an unhealthy but running application from service until it is ready again.**
**3. Liveness Probe: The Watchdog**
**Purpose**: Detects and recovers from application broken states
**The Problem It Solves**: Your application is running (the process exists) but completely hung/deadlocked. Without a liveness probe, it stays in this broken state forever.
**How It Works**:
* Runs **continuously** after startup probe succeeds
* When it **fails** repeatedly, Kubernetes **restarts the container**
* This is the "have you tried turning it off and on again" probe
**Key Configuration**:
```yaml
livenessProbe:
httpGet:
path: /actuator/health
port: 8080
initialDelaySeconds: 60 # Wait 60s (after startup)
periodSeconds: 10 # Check every 10s
timeoutSeconds: 5 # Allow 5s to respond
failureThreshold: 3 # 3 failures = restart
```
> **Liveness probes are not for crashed processes; they are used to detect a running but unhealthy application, and once the failureThreshold is exceeded, Kubernetes kills and restarts the container to recover the app.**
#### Critical Timing Relationships
The probes work together in a specific sequence:
### Storage Design
Containers are ephemeral by design, but applications often need persistent data. Here's how we solve this.
#### The Storage Stack
```
Application Data
↓
volumeMount: /var/log
↓
Pod Volume: logs-volume
↓
PersistentVolumeClaim (PVC): pvc-petclinicserver (1Gi)
↓
PersistentVolume (PV): pv-petclinicserver (2Gi)
↓
Host Storage: /mnt/petclinic_logs
```
#### PersistentVolume (PV) - The Storage Resource
**What is a PersistentVolume?**
A PersistentVolume (PV) is a cluster-wide storage resource **that represents a piece of physical storage** in your Kubernetes cluster. Think of it as a hard drive or storage space that Kubernetes knows about and can allocate to applications.
**Why do we need it?**
Containers are ephemeral - when they die, their data dies with them. But many applications need to persist data beyond the container's lifetime (logs, databases, user uploads, etc.). PersistentVolumes solve this by providing storage that exists independently of any pod.
**Key Characteristics:**
* **Cluster-wide resource**: Not tied to any specific namespace
* **Lifecycle independence**: Exists before and after pods are created/destroyed
* **Administrator-managed**: Usually created by cluster admins
* **Supports various backends**: hostPath (local), NFS, cloud storage (EBS, Azure Disk), etc.
**In our scenario:** We're creating a 2Gi storage volume on the local node using `hostPath` at `/mnt/petclinic_logs`. This storage will persist even when our pod is deleted, allowing us to recover logs after pod restarts.
**The Manifest:**
```yaml
apiVersion: v1
kind: PersistentVolume
metadata:
name: pv-petclinicserver
labels:
Environment: terraformChamps
Owner: Omar
spec:
capacity:
storage: 2Gi # Total available storage
volumeMode: Filesystem
storageClassName: standard
accessModes:
- ReadWriteOnce # Single node, read-write
hostPath:
path: /mnt/petclinic_logs # Location on host
```
**Key Points**:
* PV is a cluster-wide resource (not namespaced)
* Represents actual storage capacity
* `hostPath` is for local development only (not production!)
* `ReadWriteOnce` means one node can mount it read-write
#### PersistentVolumeClaim (PVC) - The Storage Request
**What is a PersistentVolumeClaim?**
A PersistentVolumeClaim (PVC) is **a request for storage** by a user or application. If a PersistentVolume is the "storage available," then a PVC is the "storage requested." It's like making a reservation for storage space.
**Why do we need it?**
PVCs **provide an abstraction layer** between pods and storage. Instead of pods directly mounting PVs (which would require knowing infrastructure details), they request storage through PVCs. This separates concerns: developers request storage through PVCs, and administrators provision storage through PVs.
**Key Characteristics:**
* **Namespace-scoped**: Belongs to a specific namespace (unlike PVs)
* **User-managed**: Created by application developers/users
* **Binds to PVs**: Kubernetes automatically finds a suitable PV that matches the PVC's requirements
* **Used by pods**: Pods reference PVCs, not PVs directly
**How PVC binds to PV:** Kubernetes looks for a PV that:
1. Has enough capacity (≥ requested storage)
2. Matches the access mode (ReadWriteOnce, ReadOnlyMany, etc.)
3. Matches the storage class (if specified)
**In our scenario:** We're requesting 1Gi of storage (from our 2Gi PV) with ReadWriteOnce access mode. We explicitly bind to our PV using `volumeName`, but normally Kubernetes would automatically find a matching PV.
**The Manifest:**
```yaml
apiVersion: v1
kind: PersistentVolumeClaim
metadata:
name: pvc-petclinicserver
labels:
Environment: terraformChamps
Owner: Omar
spec:
volumeName: pv-petclinicserver # Explicitly bind to our PV
resources:
requests:
storage: 1Gi # Request 1Gi from the 2Gi PV
accessModes:
- ReadWriteOnce
```
**Key Points**:
* PVC is namespaced (belongs to a project)
* Requests storage from a PV
* Can request less than PV capacity
* Binding happens automatically (or explicitly via `volumeName`)
#### Using the Volume in a Pod
```yaml
spec:
volumes:
- name: logs-volume
persistentVolumeClaim:
claimName: pvc-petclinicserver # Reference the PVC
containers:
- name: log-exporter
image: alpine:latest
volumeMounts:
- name: logs-volume # Mount the volume
mountPath: /var/log # Inside container
```
**Testing Persistence**:
```bash
# Write data
kubectl exec myapp -c log-exporter -- sh -c "echo 'test data' > /var/log/test.txt"
# Delete pod
kubectl delete pod myapp
# Recreate pod
kubectl apply -f pod.yml
# Verify data survived
kubectl exec myapp -c log-exporter -- cat /var/log/test.txt
# Output: test data
```
***
### Resource Management
Resource management is about two things: **guarantees** (requests) and **limits**.
#### Requests vs. Limits: The Critical Difference
```yaml
resources:
requests: # Used for SCHEDULING decisions
cpu: "500m" # Guaranteed 0.5 CPU cores
memory: "128Mi" # Guaranteed 128MB RAM
limits: # Used for RUNTIME enforcement
memory: "256Mi" # Cannot exceed 256MB (OOMKilled if exceeded)
```
#### How Kubernetes Uses This Information
**CPU Requests & Limits**
```
Request: 500m (0.5 cores)
Limit: (not specified)
Behavior:
✓ Scheduler guarantees 500m CPU on the node
✓ Container can use MORE than 500m if available
✓ During contention, guaranteed 500m minimum
✗ No limit = can potentially use all node CPU
✓ Never killed for using too much CPU (just throttled)
```
**Memory Requests & Limits**
```
Request: 128Mi
Limit: 256Mi
Behavior:
✓ Scheduler guarantees 128Mi on the node
✓ Container can use up to 256Mi
✗ Exceeding 256Mi = OOMKilled (container restart)
✓ Using between 128-256Mi = allowed
```
{% hint style="info" %}
If a Container specifies its own memory limit, but does not specify a memory request, Kubernetes automatically assigns a memory request that matches the limit. Similarly, if a Container specifies its own CPU limit, but does not specify a CPU request, Kubernetes automatically assigns a CPU request that matches the limit.
{% endhint %}
#### Quality of Service (QoS) Classes
Kubernetes assigns QoS classes based on your resource configuration:
| QoS Class | Configuration | Priority | Use Case |
| -------------- | ------------------------------------------------ | -------- | ------------------------ |
| **Guaranteed** | Requests = limits for all resources | Highest | Critical production apps |
| **Burstable** | At Least one Container has Memory or CPU request | Medium | Most applications |
| **BestEffort** | No requests or limits | Lowest | Development/testing |
Our configuration creates **Burstable** pods:
```yaml
petclinic:
requests: 500m CPU, 128Mi Memory
limits: 256Mi Memory # Memory limited, CPU unlimited
# QoS: Burstable
```
> **With Burstable QoS, the best practice is to set CPU and memory requests, enforce a memory limit to protect the node from memory leaks, and leave the CPU limit unset so pods can better utilize shared CPU capacity without throttling.**
***
### Pod Manifest
Now that we've covered storage and resource management, let's look at the complete pod configuration that ties everything together.
#### Pod - The Application Runtime
**What is a Pod?**
A Pod is the smallest deployable unit in Kubernetes. It's a wrapper around one or more containers that share storage, network, and a specification for how to run the containers. Think of a pod as a "logical host" - just like multiple processes can run on the same physical machine and share resources, multiple containers in a pod share resources.
**Why do we need it?**
Pods provide:
1. **Container co-location**: Run multiple containers that need to work closely together
2. **Shared resources**: Containers in a pod share the same network namespace (localhost), storage volumes, and process namespace (if configured)
3. **Lifecycle management**: All containers in a pod are scheduled together, start together, and scale together
4. **Health monitoring**: Kubernetes can monitor container health through probes
**Single Container vs Multi-Container Pods:**
**Single Container Pod** (Most common):
* One application per pod
* Simple, straightforward deployment
* Example: A web server
**Multi-Container Pod** (Our approach):
* Multiple containers that need tight coupling
* Multi-Container Patterns:
1. **Sidecar** (our example):
* Auxiliary functionality (logging, monitoring)
* Shares pod lifecycle
2. **Ambassador**:
* Proxy to external services
* Simplifies network configuration
3. **Adapter**
* Standardizes output/formats
* Useful for heterogeneous environments
* Example: Main app + log shipper, Main app + proxy
**The Sidecar Pattern (What we're using):**
The Sidecar pattern involves running a helper container alongside the main application container. The sidecar enhances or extends the main container's functionality without changing it.
**Our Sidecar Use Case:**
* **Main Container (petclinic)**: Runs the Spring Boot application
* **Sidecar Container (log-exporter)**: Collects and writes logs to persistent storage
**Benefits of this pattern:**
* Separation of concerns (main app doesn't need to handle log persistence)
* Independent scaling and updates
* Reusable sidecars across different applications
* Shared storage through volume mounts
**Health Probes in Action:**
Our pod implements all three probe types to ensure maximum reliability:
1. **Startup Probe (120s window)**:
* Gives the Spring Boot app time to initialize
* Prevents premature killing during slow startup
2. **Readiness Probe (every 5s)**:
* Checks if app is ready to serve traffic
* Removes pod from service if health check fails
3. **Liveness Probe (every 10s)**:
* Detects if app is deadlocked or hung
* Restarts container if health check fails repeatedly
**Resource Management:**
We define both requests and limits:
* **Requests**: Guaranteed resources for scheduling
* **Limits**: Maximum resources to prevent runaway consumption
**Storage Integration:**
The pod mounts our PVC (`pvc-petclinicserver`) as a volume (`logs-volume`), which is then mounted into the sidecar container at `/var/log`. This creates a persistent log storage location.
**Pod Manifest:**
{% code expandable="true" %}
```yaml
apiVersion: v1
kind: Pod
metadata:
name: myapp
labels:
app.kubernetes.io/name: myapp
Environment: terraformChamps
Owner: Omar
spec:
volumes:
- name: logs-volume
persistentVolumeClaim:
claimName: pvc-petclinicserver
containers:
# ==========================================
# Main Application Container
# ==========================================
- name: petclinic
image: omartamer12/petclinicc:v9
# Startup Probe: Allows 120s for slow startup
startupProbe:
httpGet:
path: /actuator/health
port: 8080
initialDelaySeconds: 10
periodSeconds: 10
timeoutSeconds: 5
failureThreshold: 12 # 12 * 10s = 120s max startup time
successThreshold: 1
# Readiness Probe: Controls traffic routing
readinessProbe:
httpGet:
path: /actuator/health
port: 8080
initialDelaySeconds: 30 # After startup probe succeeds
periodSeconds: 5 # Check frequently
timeoutSeconds: 3
failureThreshold: 3 # Quick removal from service
# Liveness Probe: Detects deadlocks
livenessProbe:
httpGet:
path: /actuator/health
port: 8080
initialDelaySeconds: 60 # Conservative delay
timeoutSeconds: 5
periodSeconds: 10
failureThreshold: 3
successThreshold: 1
# Resource Management
resources:
requests:
cpu: "500m" # Guaranteed 0.5 CPU
memory: "128Mi" # Guaranteed 128MB
limits:
memory: "256Mi" # Max 256MB (OOMKilled if exceeded)
ports:
- containerPort: 8080
# ==========================================
# Sidecar Container: Log Exporter
# ==========================================
- name: log-exporter
image: alpine:latest
# Generates logs every 10 seconds
command:
- "/bin/sh"
- "-c"
- "while true; do date >> /var/log/app.log; sleep 10; done"
resources:
requests:
cpu: "500m"
memory: "256Mi"
limits:
memory: "512Mi"
# Mount shared volume
volumeMounts:
- name: logs-volume
mountPath: /var/log
```
{% endcode %}
***
### Validation & Operations
#### Scripts for Testing
**Probe Status Monitor (probe-status.sh)**
This script provides intelligent probe status monitoring:
{% code expandable="true" %}
```bash
#!/bin/bash
# -------------------------
# Argument validation
# -------------------------
if [ $# -ne 2 ]; then
echo "Usage: $0 "
echo "Example:"
echo " $0 myapp petclinic"
exit 1
fi
POD="$1"
CONTAINER="$2"
# ---- Probe config (must match YAML) ----
READINESS_INITIAL_DELAY=30
STATUS=$(kubectl get pod "$POD" -o json)
CS=$(echo "$STATUS" | jq ".status.containerStatuses[] | select(.name==\"$CONTAINER\")")
READY=$(echo "$CS" | jq -r '.ready')
STARTED=$(echo "$CS" | jq -r '.started')
RESTARTS=$(echo "$CS" | jq -r '.restartCount')
STATE=$(echo "$CS" | jq -r '.state | keys[0]')
LAST_REASON=$(echo "$CS" | jq -r '.lastState.terminated.reason // "None"')
POD_START_TIME=$(echo "$STATUS" | jq -r '.status.startTime')
NOW=$(date -u +%s)
START_TS=$(date -d "$POD_START_TIME" +%s)
POD_AGE=$((NOW - START_TS))
echo "=== Probe Health Status ==="
echo "Pod: $POD"
echo "Container: $CONTAINER"
echo "State: $STATE"
echo "Restarts: $RESTARTS"
echo "Pod Age: ${POD_AGE}s"
echo ""
# --------------------
# Readiness (SMART)
# --------------------
if [ "$POD_AGE" -lt "$READINESS_INITIAL_DELAY" ]; then
echo "🟡 Readiness Probe: WAITING (initialDelaySeconds not elapsed yet)"
elif [ "$READY" = "true" ]; then
echo "🟢 Readiness Probe: READY (container receiving traffic)"
else
echo "🔴 Readiness Probe: PROBING (health check failing)"
fi
# --------------------
# Startup
# --------------------
if [ "$STARTED" = "true" ]; then
echo "🟢 Startup Probe: COMPLETED (startup phase finished)"
else
echo "🟡 Startup Probe: IN PROGRESS (startup probe still running)"
fi
# --------------------
# Liveness
# --------------------
if [ "$RESTARTS" -eq 0 ]; then
echo "🟢 Liveness Probe: HEALTHY (no restarts)"
elif [ "$RESTARTS" -lt 3 ]; then
echo "🟡 Liveness Probe: UNSTABLE ($RESTARTS restarts)"
else
echo "🔴 Liveness Probe: FAILING ($RESTARTS restarts)"
fi
echo ""
echo "Last Termination Reason: $LAST_REASON"
echo ""
echo "For definitive probe failures always check:"
echo " kubectl describe pod $POD"
```
{% endcode %}
**Usage**:
Monitor Health Probes
```bash
# Check probe status
./probe-status.sh myapp petclinic
# Sample output:
# 🟢 Readiness Probe: READY (container receiving traffic)
# 🟢 Startup Probe: COMPLETED (startup phase finished)
# 🟢 Liveness Probe: HEALTHY (no restarts)
```
**CPU Resource Test (resource-cpu-test.sh)**
This script validates CPU throttling behavior:
{% code expandable="true" %}
```bash
#!/bin/bash
# -------------------------
# Argument validation
# -------------------------
if [ $# -ne 2 ]; then
echo "Usage: $0 "
echo "Example:"
echo " $0 myapp petclinic"
exit 1
fi
POD="$1"
CONTAINER="$2"
# -------------------------
# Verify pod exists
# -------------------------
if ! kubectl get pod "$POD" >/dev/null 2>&1; then
echo "❌ Pod '$POD' not found"
exit 1
fi
# -------------------------
# Verify container exists
# -------------------------
if ! kubectl get pod "$POD" -o jsonpath="{.spec.containers[*].name}" | grep -qw "$CONTAINER"; then
echo "❌ Container '$CONTAINER' not found in pod '$POD'"
echo "Available containers:"
kubectl get pod "$POD" -o jsonpath="{.spec.containers[*].name}"
echo ""
exit 1
fi
echo "=== Resource Limits & Requests Test ==="
echo "Pod: $POD"
echo "Container: $CONTAINER"
echo ""
# -------------------------
# Show configured resources
# -------------------------
echo "▶ Configured Resources:"
kubectl get pod "$POD" -o jsonpath="
Requests:
CPU: {.spec.containers[?(@.name=='$CONTAINER')].resources.requests.cpu}
Memory: {.spec.containers[?(@.name=='$CONTAINER')].resources.requests.memory}
Limits:
CPU: {.spec.containers[?(@.name=='$CONTAINER')].resources.limits.cpu}
Memory: {.spec.containers[?(@.name=='$CONTAINER')].resources.limits.memory}"
echo ""
echo ""
# -------------------------
# Current usage
# -------------------------
echo "▶ Current Resource Usage:"
kubectl top pod "$POD" --containers
echo ""
echo ""
# -------------------------
# CPU stress test
# -------------------------
echo "▶ CPU Stress Test (should NOT restart)"
echo "Running CPU loop for 20s..."
kubectl exec "$POD" -c "$CONTAINER" -- sh -c \
"timeout 20 sh -c 'while true; do :; done'"
echo ""
echo "▶ CPU Usage After Test:"
kubectl top pod "$POD" --containers
echo ""
echo ""
echo "Key Takeaways:"
echo "- CPU pressure → throttling, NOT restarts"
echo "- Requests affect scheduling, not enforcement"
echo ""
echo "Always verify with:"
echo " kubectl describe pod $POD"
```
{% endcode %}
**Usage**:
Test Resource Limits
```bash
# Run CPU stress test
./resource-cpu-test.sh myapp petclinic
# This validates that CPU limits cause throttling, not restarts
```
***
#### Step-by-Step Deployment Guide
**Step 1: Create Your Cluster**
```bash
# Using kind
kind create cluster --name forgtech-lab
# Verify
kubectl cluster-info
kubectl get nodes
```
Step 2: Deploy Storage Resources
```bash
# Create PV & PVC
kubectl apply -f pv.yml -f pvc.yml
# Verify binding
kubectl get pv,pvc
# Expected output:
# NAME CAPACITY STATUS CLAIM
# persistentvolume/pv-petclinicserver 2Gi Bound default/pvc-petclinicserver
#
# NAME STATUS VOLUME
# persistentvolumeclaim/pvc-petclinicserver Bound pv-petclinicserver
```
Step 3: Deploy the Pod
```bash
# Deploy
kubectl apply -f pod.yml
# Watch startup (this will take ~80-120 seconds)
kubectl get pod myapp -w
# You'll see(After Multiple time of spamming kubectl get pod myapp -w:
# NAME READY STATUS RESTARTS AGE
# myapp 0/2 ContainerCreating 0 5s
# myapp 0/2 Running 0 10s
# myapp 1/2 Running 0 45s <- log-exporter ready
# myapp 2/2 Running 0 85s <- petclinic ready
```
Step 4: Monitor Probe Status
```bash
# Check probe status
./probe-status.sh myapp petclinic
# During startup, you'll see:
# 🟡 Readiness Probe: WAITING (initialDelaySeconds not elapsed yet)
# 🟡 Startup Probe: IN PROGRESS (startup probe still running)
# 🟢 Liveness Probe: HEALTHY (no restarts)
# After full startup:
# 🟢 Readiness Probe: READY (container receiving traffic)
# 🟢 Startup Probe: COMPLETED (startup phase finished)
# 🟢 Liveness Probe: HEALTHY (no restarts)
```
Step 5: Verify Persistent Storage
{% code expandable="true" %}
```bash
# Enter the sidecar container
kubectl exec -it myapp -c log-exporter -- sh
# Inside the container:
ls -la /var/log/
cat /var/log/app.log
# You should see timestamps being appended every 10 seconds
# Exit the container
# Now test persistence by deleting the pod
kubectl delete pod myapp
# Recreate it
kubectl apply -f pod.yml
# Wait for it to start, then check the logs again
kubectl exec -it myapp -c log-exporter -- cat /var/log/app.log
# The old data should still be there!
```
{% endcode %}
Step 6: Test Resource Behavior
```bash
# Run the CPU stress test
./resource-cpu-test.sh myapp petclinic
# This will:
# 1. Show configured resources
# 2. Show current usage
# 3. Run a CPU-intensive loop
# 4. Show usage after the test
# 5. Verify the pod was NOT restarted
```
***
### Debugging Common Issues
#### Issue 1: Pod Stuck in "Pending" State
```bash
# Check pod events
kubectl describe pod myapp
# Look for:
# "FailedScheduling: 0/1 nodes are available: insufficient cpu"
# "FailedScheduling: 0/1 nodes are available: insufficient memory"
# Solution: Reduce resource requests or add more nodes
```
#### Issue 2: PVC Not Binding
```bash
# Check PVC status
kubectl get pvc pvc-petclinicserver
# If STATUS shows "Pending":
kubectl describe pvc pvc-petclinicserver
# Common causes:
# - PV doesn't exist
# - StorageClass mismatch
# - Access mode incompatibility
# - Insufficient capacity
# Fix: Ensure PV exists and matches PVC requirements
```
#### Issue 3: Container Constantly Restarting
```bash
# Check restart count
kubectl get pod myapp
# View logs from crashed container
kubectl logs myapp -c petclinic --previous
# Check probe configuration
kubectl describe pod myapp | grep -A 10 "Liveness\|Readiness\|Startup"
# Common causes:
# - Probe timing too aggressive
# - Application actually failing
# - Memory limit too low (OOMKilled)
# Check for OOMKilled:
kubectl describe pod myapp | grep -i "OOMKilled"
```
#### Issue 4: Probe Failures
```bash
# Test the health endpoint manually
kubectl exec myapp -c petclinic -- wget -O- http://localhost:8080/actuator/health
# If this fails, your application isn't healthy
# If it succeeds, check probe configuration
# View detailed probe events
kubectl describe pod myapp | grep -i "probe failed"
```
***
## Conclusion
Building production-ready Kubernetes pods isn't just about running containers it's about:
1. **Resilience**: Health probes that prevent downtime
2. **Efficiency**: Resource management that prevents waste
3. **Reliability**: Persistent storage that survives failures
The configuration we built to solves:
* **No more startup downtime**: Startup probe allows slow initialization
* **No more data loss**: PV/PVC ensures persistence
* **No more resource contention**: Proper requests and limits
You Could see the Full Implementation in [GitHub](https://github.com/omartamer630/kuberentestasks/tree/main/task_one)
This is the foundation of cloud-native application deployment. Master these concepts, and you'll be ready to run production workloads with confidence.
***
## Questions or Feedback?
If you found this guide helpful, please share it with your team. If you have questions or suggestions, feel free to reach out!
**Author**: Omar Tamer
* [LinkedIn](https://www.linkedin.com/in/omar-tamer03/)
* Gmail:
Happy Kubernetes-ing!
***